Tampilkan postingan dengan label Coreldraw. Tampilkan semua postingan

Creating USB Flash Disk with CorelDRAW

This time I'm Trying to Publish for That Make Your USB Flash Disk with CorelDRAW,


Inspired by a blog provider of photoshop tutorials are famous dremi.info, so this time we will make Flash Disk but using Coreldraw.

Expert Tutorial - Please master Coreldraw Layout and slightly Function Tool Box Coreldraw
Step - Steps:


Step 1:

- Open and Select Program Coreldraw NEW
- Make 2 circles and 1 Fruit Box on paperwork CorelDRAW


Then Combine so attached to each other like this:


then press CTRL + A to select all wake up and use Weld to combine, result:
Will form up as drug capsules.

Step 2:

In the wake press F12 and set it like this:


The results are as below:


Now give effect Transparacy
Press [+] to double-up terbebut and color with white color:


Then use the Interactive Transparency Tool, then use the No Outline to remove the border line-up
So the result is like this:


Then Press [CTRL] + [A] and [CTRL] + [G] to Group

Step 3:

Before the break-up should be used to wake the double
Broke them to form like this, here I use Trim
How create a box and put it in the wake of the flash diks and both selection and press Trim.


Before You Trim

 Once in Trim 

Now we just remove the safety relief Trim
then move them closer together, jodohkan.

 
 As medicine capsules Happens Here Ya !..

 Step 4:
 
Add Various Accessories like box on USB


then


 Well if gini already like FLASH Disk

Step 5:

Paint! .. How like the Step 2
If trouble immediately wrote to use color palette and paint with black and gray

The result (as in Step 2):


For those who are beginners can use Corol Pallete Only

The results (with the usual steps. Color Pallete)


Step 6:

Add garnish and words - words that appear clear as a Flash Disk.


to string using the Pen Tool.


Acknowledgements Congratulations on producing a flahs DISK
Respect Work Made Kids Negri: In Indonesia

If you are Pleased have little time to spare then there is no harm in editing and improving and adding another Effects of the other.


Creating 3D Maps with Coreldraw


How to create a 3-dimensional map with coreldraw commonly used for wedding invitations, invitation walimahan, and others that look more attractive and look different with the look of a site plan or a direction other way.

CorelDraw Tutorial Basic level there are three main stages then you will learn such things as:

- Transform objects
- Group / combine objects
- Make a line with the bezier tool
- Changing the line into objects
- Changing jenist point point on the line
- Coloring the object and lines
- Changing the size of the line
- Using the bezier tool
- Using the Shape Tool
- Creating 3D objects (three-dimensional) with CorelDraw etc.

All you have to do first is mngetahui form of rough road, street name, building name and complementary directions. You can use an existing map via google maps and in print the next screen enter into coreldraw a way to import (CTRL + I).

1. Insert image from google maps that you print screen by clicking the Import File menu (CTRL + I). To end the import click where you want to put these Gamber. You can also enter through click drag the image from explorer to coreldraw.


2.Kunci location of the image so as not to move the location by right click on the image and select Lock Object.


 3. Next we are going to do the path (plagiarizing images from google maps). Use the bezier tool. If you do not plagiarize directly for road use in the map using the bezier tool. To use this tool you do click on the first point and click on the second point, and click or drag you can do so that the path is generated in the form of the curve (the curve). To use the tool to move the space bar on the keyboard and press the space bar once again that the first tool change with tool (in this case the bezier tool). Keep the entire line is made each cover / overwrite the line with one another. Please view (visibility) by sliding your mouse scroll in order to trace the steps easier.


To change or edit a line using a line shape tool :


When you are finished copying delete the image next map by right-clicking on the image select Unlock and delete. Fix once more on the lines that do not close completely.


4. Please select the size of the line with all these lines can be by way of a line SHIFT + CLICK highlight one by one or all of them with the pick tool and then change the line size to 16 pt.


5. Change the line into objects by selecting all lines and click Menu Arrange> Convert Outline to attractions.

6. Merge all objects into one section of the line using the Weld.


7. Paint the shape object by clicking the color white with white and black right-click on the color palette so that the object shape has a line of black (color palete is on the right side workpace)

8. Type the existing road to the text tool (F8) and turn adjust the direction of the road (try the same font size and be in the road). If all the text is in place, turn into a curve by means of selection all the way text and click Menu Arrange> Convert to Curve.


9. Selection of all objects (roads and writing the way) and join by right clicking on one of the selected objects select Group (CTRL + G)

10. Perform the transformation on the object selected above using the Interactive Envelope Tool. Customize the shape transformation of the view that you want.


11. If completed as desired and click Menu Arrange> Convert to Curve.

12. Broke out again between the road and the joint text by right-clicking on the object and choose Ungroup (CTRL + U).

13. Select the first object using the Pick Tool and make ends CLICK CLICK + DRAG Right (do copy paste if difficulties in this technique) so the two. Position the second path is under the latter path and change the color to black. Put the second object is under the first object (overwrite) using right click> Order> To Back of Page (SHIFT + Page Down).


14. Using the Shape tool closes street corners to resemble three-dimensional objects. Do a double click to add a point point, try to type point at the street corners in the form of line (straight line). To close this corner used to activate the snap to objects that point we'll be sticking to the moving object closest.


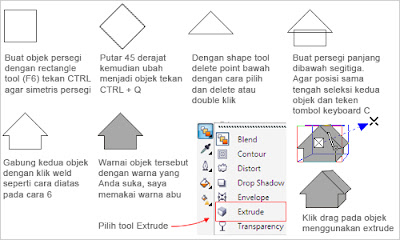
15. Next create buildings, homes, important places and so with the Rectangle Tool (F6) and change into 3 dimensions using extrude.


16. Place the objects in the right place with your maps. Copy and paste the desired places. Repeat Make different objects fit the way to building 15 and other places. Write the name of the place, the name of the building to its name using the text tool.

17. The result I can get is as follows.


Acknowledgments With luck and Happy eraktifitas With this article. and do not forget to join with other friends on Facebook AhliDesain, and follow my Twitter. If you like my articles from do not forget to include it in ahlidesain subscribe to the RSS Feed.

Corel : Creating Maps 3 D

Now I Share This tutorial Again About Corel: Creating Maps 3 D. In the invitation card, a map is an integral part. Sometimes printing companies offer it in a package, which includes invitations, thank you cards, location maps, plastic souvenirs, guest books, etc.

With this tutorial, will be made in 3-D map Corel X3, tools used include pen tool, text tool, Rectangle tool, while the facility is being used weld and add perspective.

The following steps - steps :

1. The first step should always be done before making a picture is a set area of ??the image, here is the size of 90 x 145 mm, make the box as a guideline.

2. Select the pen tool, create a flow path by clicking the first to determine the starting point and drag the mouse in the desired direction and click to specify the end point, where the first and second point there is a line that connects. To create a curved path: click drag mouse click hold and drag the mouse to create a curved.


3. If completed, select Edit> Select All (Ctr A) press F12 to set the property line, give the line thickness = 11 pt. Then select the menu Arrange> Convert to Curves (Ctrl + Q) to make the line into a curve. Adjust the Color Pallet color = black line, fill = yellow.

4. To unify the curve was select Dockers shaping or weld on the Main Menu select Arrange> Shaping> Weld.

5. Furthermore, the form had to be 3-D objects, how to activate the object, choose Effects> Add

Perspective.


6. Select the end of the handle, so the cursor will turn into a sign (+), click - hold - drag the handle to create perspective. Stop if we've got the shape we want.


7. Create text to name the road, keep it in the desired place.


8. To create an image of the building, use the Rectangle tool, create a rectangle object, give the color, change the square had become the 3D Extrude Interactive click, hold and drag the image click the line to form a 3D object, for more details, it is also related to (read: Easily Posts 3d with Coreldraw), adjust the perspective that we make.


9. In addition to a rectangular shape, can also form a triangle, polygon or pictures home.
The result is about - something like this Below :


My gratitude Together Because We Have Elaborate article Corel It That Way: Creating Maps 3 D. Good luck and Congratulations activity / Helpful For You

Creating Posts CLIP Effect

Coreldraw Tutorial This time we will try to create an effect of writing with the name Coreldraw clip effects.

Next step - his steps:

1. background for such a gray box.

2. tect for 'CLIP' with black arial font.


Start working :

1. create a closed curve, with the pen tool, then fill color or fill with black.


2. closed curves are colored black to white gradation interactive fill tool to tool. Drag as shown below.


3. we plan to use the effect of power clip to insert curves into the text 'CLIP'. But the results will come in the middle of the curve text as shown below:


 4. to change the order PowerClip not automatically in the text (container). Klikmenu tools => options: workspace: edit. Turn off auto-check list PowerClip centents new center.


5. PowerClip now ready, turn the curve, and then click the effect => PowerClip => place inside a container, click the text 'CLIP'.


6. By way as before you certainly can make black gradation putihUntuk text 'CLIP' so it appears as follows.


7. To better feel the difference with the background, create a white outline on text'CLIP 'following sebaggai.


8. In order to feel again the difference with the background, create a shadow padaText 'CLIP' with interactive drop shadow tool.

9. Drag text from the middle down diagonally as follows.

 EFFECT CLIP


thanks this tutorial I Make Posts CLIP Effect luck and congratulations activities.

CARA MEMBUAT DESAIN STEMPEL

Hari Ini Saya Publikasikan Dan Membarikan Tips Bagaimana Cara Membuat Desain Stempel, Naah Langsung Saja Kita Ke Inti Langkah Pertama Cara Membuat Objek Yang Berbentuk Lingkaran Dengan Diameter 35 mm.

Seperti Gambar Di Bawah Ini :


Copy Lingkaran Tersebut Kemudian Anda Ubah Langsung  Diameternya Menjadi 23 mm

Seperti Gambar Di Bawah Ini :


Sekarang Buat Guide Untuk Teks Nya, Copykan Lagi Berbentuk Lingkaran Yang Kecil Dan Rubah Diameternya Menjadi 25 mm, Tandai Dan Beri Dengan Warna merah, Caranya Klik Kanan Pada Warna Merah Pada Color Palette.

Seperti Gambar Di Bawah Ini :


Sekarang Kita Hanya Butuh 3/4 Dari Seluruh Lingkaran Merah, Aktifkan Lingkaran Merah Pada Propertybar Pilih Yang Berbentuk <Arc>

Seperti Gambar Di Bawah Ini :


Gunakan Shape Tool Untuk Menarik Sudut Dari Lingkaran.

Seperti Gambar Di Bawah Ini :


Buat Satu Guide Untuk Tulisan Yang Dibawah Dengan Mengcopy Lingkaran Yang Berwarna Merah, Kemudian Shape Tool Tarik Sudutnya.

Seperti Gambar Di Bawah Ini :


Sekarang Anda Klik Teks : CV.WAHANA JAYA kOMPUTER. Font Yang Saya Pergunakan type : IMPACT : SIZE : 12 . Aktifkan Teks Tersebut Dan Klik Menu Text >>Fit Text To Path Lalu Klik Lingkaran Warna Merah Yang Di Atas.

Seperti Gambar Di Bawah Ini :


Untuk Teks Yang Di Bagian Bawah Sama Caranya Dengan Yang Di Atas, Ketik Teks <LANGKAT> 

Seperti Gambar Di Bawah Ini :


Lalu Hilangkan Warna Merah Pada Lingkaran Guide Dengan Cara Aktifkan/Klik Guide Tersebut Menggunakan Shape Tool, Kemudian Klik Kanan Icon Paling Atas Pada Color Palette.

Seperti Gambar Di Bawah Ini :


Lalu Beri Tanda Bintang Di Antara Teks Atau Pertebal Beberapa Point.

Seperti Gambar Di Bawah Ini :


 Selesai Hasilnya Seperti Gambar Di Bawah Ini :


Untuk Lebih Nyatanya Anda Bisa Bergabung Dengan Tutorial Di Effect Stample CorelDRAW

Ucapan Terimakasih Dengan Cara Membuat Desain Stempel Ini Semoga Berhasil Dan Selamat Beraktifitas.